Nothing in the docs matches that. Try fewer words, or
Getting started
Install, open a game, play. That's the whole setup: Clip Engine finds your games, records in the background and saves clips by itself.
- Download the installer
Clip_Engine-Setup.exe, about 40 MB. It's free and needs no account. - Run itPick whether you'd like a desktop shortcut and press Install. It installs for your Windows account only, so there's no admin prompt. If Windows says the app is from an unknown publisher, choose More info, then Run anyway.
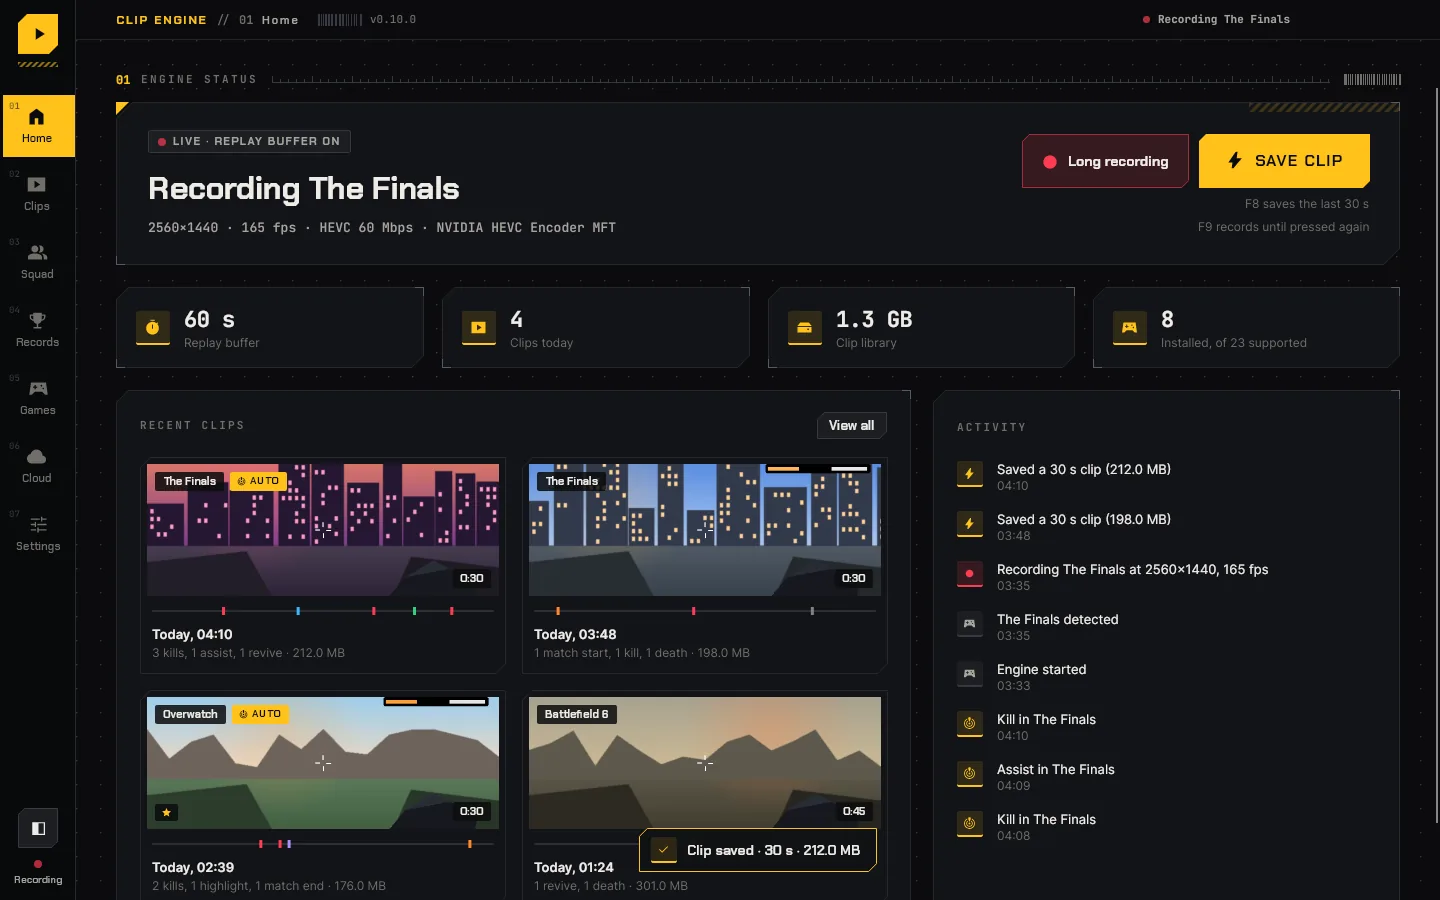
- Let it openClip Engine starts when the installer finishes and sits in the system tray. Home shows the engine running and the replay buffer filling.
- Launch a gameClip Engine notices it and starts recording on the monitor the game is on. You'll see the game on Home with a red REC.
- PlayKills, assists, deaths, revives, multi-kills and match results are clipped by themselves. Press F8 any time to save the last 30 seconds.
For games that show kills in a killfeed, like Valorant, Marvel Rivals, Rainbow Six Siege or The Finals, open the Games page and type your in-game name. That's how Clip Engine tells your kills from everyone else's.
What you need
- Windows 10 (version 1903 or newer) or Windows 11.
- A graphics card with a video encoder. Practically every NVIDIA, AMD or Intel GPU from the last ten years has one.
- No dependencies. No account, nothing else to install, nothing injected into your games.
Installer or portable zip
Both are the same app. Pick whichever suits you.
| Installer | Portable zip | |
|---|---|---|
| File | Clip_Engine-Setup.exe | Clip_Engine-windows-x64.zip |
| Setup | Run it. Adds Clip Engine to the Start menu, and to the desktop if you like. | Unzip it anywhere, keep the files together and run ClipEngine.exe. |
| Admin rights | Not needed. It installs for your account only. | Not needed. |
| Removing it | Windows Settings, Apps, then Clip Engine, Uninstall. | Delete the folder. |
| Updates | Both update themselves from Settings › Updates. | |
Early builds aren't code-signed yet, so Windows SmartScreen may stop the installer the first time. Choose More info, then Run anyway. Signed builds are coming before the full launch.
Your first clip
While a game is open, Clip Engine keeps the last minute of gameplay ready in memory, the replay buffer. Nothing is written to disk until a clip is saved, so it costs your drive nothing.
Saved by itself
When Clip Engine sees a kill, assist, death, revive, multi-kill, match start or result, it saves a clip around it: 10 seconds before the moment and 5 after by default, with moments close together joined into one clip. These clips carry an AUTO tag.
Saved with a key
Press F8 and the last 30 seconds are saved, in any game, even one Clip Engine doesn't know. You can also press Save clip on Home or in the side panel.
Finding it
A small notice in the corner says the clip was saved (it never shows up in your clips). Open the Clips page to watch it, or find the file in Videos\Clip_Engine\<Game>.
Close the window and Clip Engine keeps recording from the tray. To quit, right-click the tray icon. You can change this with Close to tray in Settings › App.
Updating and uninstalling
Clip Engine looks for a new version when it starts, and nothing installs until you choose to. When one is out, a bar at the top of the window says Update ready.
- Settings › Updates › Install and restart downloads and installs it, then reopens Clip Engine.
- Check now looks straight away. Turn off Look for updates when Clip Engine starts if you'd rather only check by hand.
- Install from a zip takes a
Clip_Engine-windows-x64.zipyou've already downloaded, for a PC without internet.
To uninstall, use Windows Settings, then Apps, then Clip Engine, or delete the folder if you used the zip. Your clips and settings are kept, so a reinstall picks up where you left off. To remove those too, delete Videos\Clip_Engine and %LOCALAPPDATA%\Clip_Engine.
Clip keys and hotkeys
Every key can be changed in Settings › Hotkeys. Type a key like F8, Alt+F10 or Ctrl+Shift+S.
| Key | What it does |
|---|---|
| F8 | Saves the last 30 seconds (your clip length). |
| F9 | Starts a long recording; press it again to stop. |
| Alt+Shift+C | Shows or hides the side panel over your game. |
| Alt+Shift+F | Turns the FPS and PC stats overlay on and off. |
More clip keys
Under More clip keys, add keys that each save their own length, say Alt+F8 for 15 seconds and Shift+F8 for two minutes. Each can be as long as the replay buffer.
Keys for one game
A game can have its own set of keys that replaces the ones in Settings while you play it. Open Detection Studio, pick the game, and under Clip keys in this game turn on Own keys, add them and press Save keys.
How much is kept
In Settings › Recording, Replay buffer is how much gameplay is kept ready (up to 30 minutes), and Clip length is how much of it F8 saves. A longer buffer uses more memory; Settings shows how much and warns you if your PC would struggle.
Automatic clips
Clip Engine finds moments in two ways. Where a game has official live data (Counter-Strike 2, Dota 2, League of Legends, Rocket League) or a console log (Team Fortress 2), it uses that, which is exact. Everywhere else it reads the HUD with on-device text recognition: the killfeed, popups, banners and medals. Nothing is injected into the game, and nothing leaves your PC.
All of this is in Settings › Automatic clips:
| Setting | What it does |
|---|---|
| Detect moments | Reads kills, assists, revives and more while you play. Off, only your keys save clips. |
| Universal HUD reader | Reads games that have no rules of their own with a small learned model. See Supported games. |
| Reading quality | Low, Medium (the default), High or Ultra. Higher reads more accurately and uses more CPU. |
| Multi-kills and streaks | Double to penta kills, and every fifth kill without dying, become highlights in every game. |
| Save clips by themselves | Saves a clip around each moment you pick under Clip these moments: kills, assists, deaths, revives, match start, match end and highlights. |
| Before the moment | Gameplay kept from before it happened, 10 seconds by default. |
| After the moment | Gameplay kept after, 5 seconds by default. Moments close together end up in one clip. |
| Clip deaths on their own | Off, a death is only kept as part of the fight around it. |
| Keep a journal of each run | The journal for extraction and co-op games. |
Set your in-game name, make sure the game's HUD size matches in Detection Studio, and try a higher reading quality. Check detection shows exactly what was caught and missed.
Voice clips
Say "clip that" and the last moments are saved, with no key to reach for. Turn on Clip by voice in Settings › Voice clips.
- Phrases: pick your own, separated by commas. A number after a phrase gives it its own length, like
save the last minute 60. - Clip length: how much a phrase saves when it has no length of its own. All the way left uses your normal clip length.
- Sensitivity: Low needs you to be clearer; High catches more but may hear a phrase you didn't say.
Windows' own speech recognition listens on your PC, and nothing you say leaves it. It needs a Windows speech recognizer for your language; the log says so if there isn't one. Voice clips still hear you when your mic track is muted. Clips saved this way have a VOICE tag.
Long recordings
Press F9 to record a whole session, and press it again to stop. It keeps going for as long as you like, every moment is still marked on its timeline, and it's saved next to your clips as <Game>_<date>_long.mp4. Change the key under Long recording hotkey in Settings › Hotkeys.
To record with no game open, turn on Record without a game: Clip Engine keeps a buffer of your main monitor, and F8 works on the desktop too.
Quality and performance
Recording runs on your GPU's video encoder, separate from the part that draws your game, so most players won't notice it. Settings live in Settings › Recording:
| Setting | Choices |
|---|---|
| Resolution | Your monitor's own, or 2160p, 1440p, 1080p, 720p or 480p. Free records up to 1080p, Pro and Ultra up to 4K. It never records bigger than your monitor. |
| Frame rate | Match monitor records at your refresh rate up to 120 fps, which keeps it light. Pick 144, 165 or 240 fps to record faster. |
| Bitrate | Auto picks one from the resolution and frame rate. Higher looks better and makes bigger files. |
| Codec | Auto uses H.264, and HEVC when the resolution needs it. H.264 plays everywhere; HEVC makes smaller files. |
Record only the game (in Settings › Hotkeys, on by default) keeps everything else on your PC out of your clips: when you switch to another window, the video shows Game Not Found and game audio goes quiet until you're back.
Lower the resolution or frame rate first, then the replay buffer. A buffer of many minutes at 4K takes several gigabytes of memory.
Audio tracks
Each sound source is recorded on a track of its own, after a first track with everything mixed, which is the one every player plays. In Settings › Audio you can turn each on or off, set its volume, or mute it, even mid-game.
- Game: only the game, quiet while you're in another window. On Windows older than version 2004 it's everything you hear.
- Microphone: your voice. Muted, it's kept out of clips.
- Discord: Discord calls, and TeamSpeak or Mumble, so squad chat can be turned down on its own.
- Other apps: music, videos and anything else that plays.
Volume and mute apply straight away. Turning a track on or off applies when you press Save changes. Video editors that read multi-track files (like DaVinci Resolve or Premiere) show each track separately.
Clips and matches
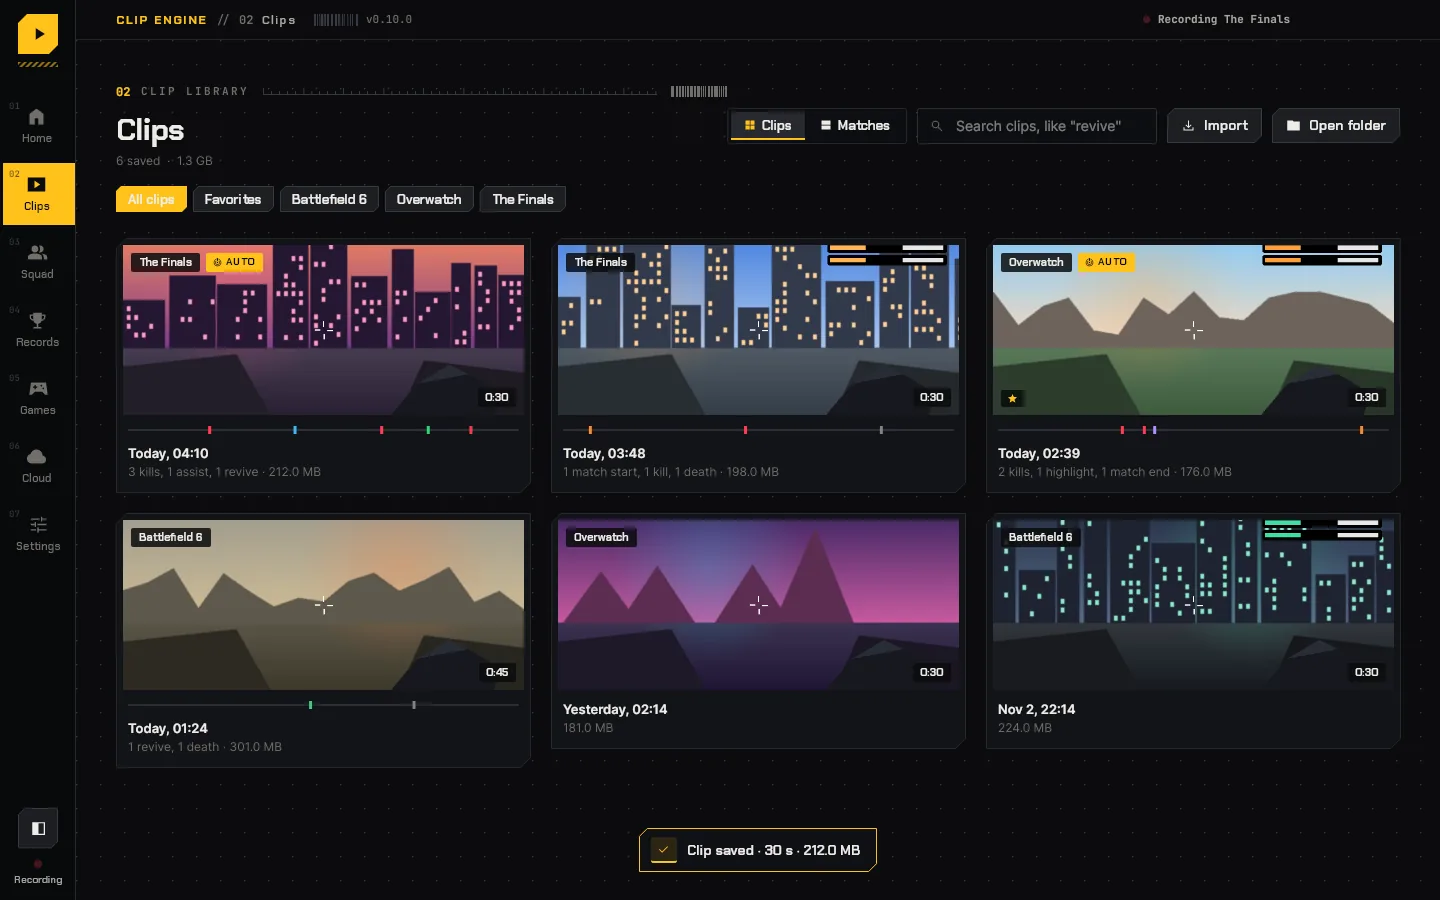
The Clips page has every clip, grouped by game, newest first.
- Clips or Matches at the top switches between every clip on its own and clips grouped by match, with the whole match's moments in order.
- Search finds clips by what's in them: try "revive" or a game's name.
- Star a clip to keep it as a favourite. Favourites are never cleaned up.
- Import adds a clip someone sent you, or drop it on the window.
- Open folder shows the files in Windows Explorer.
The player and moments
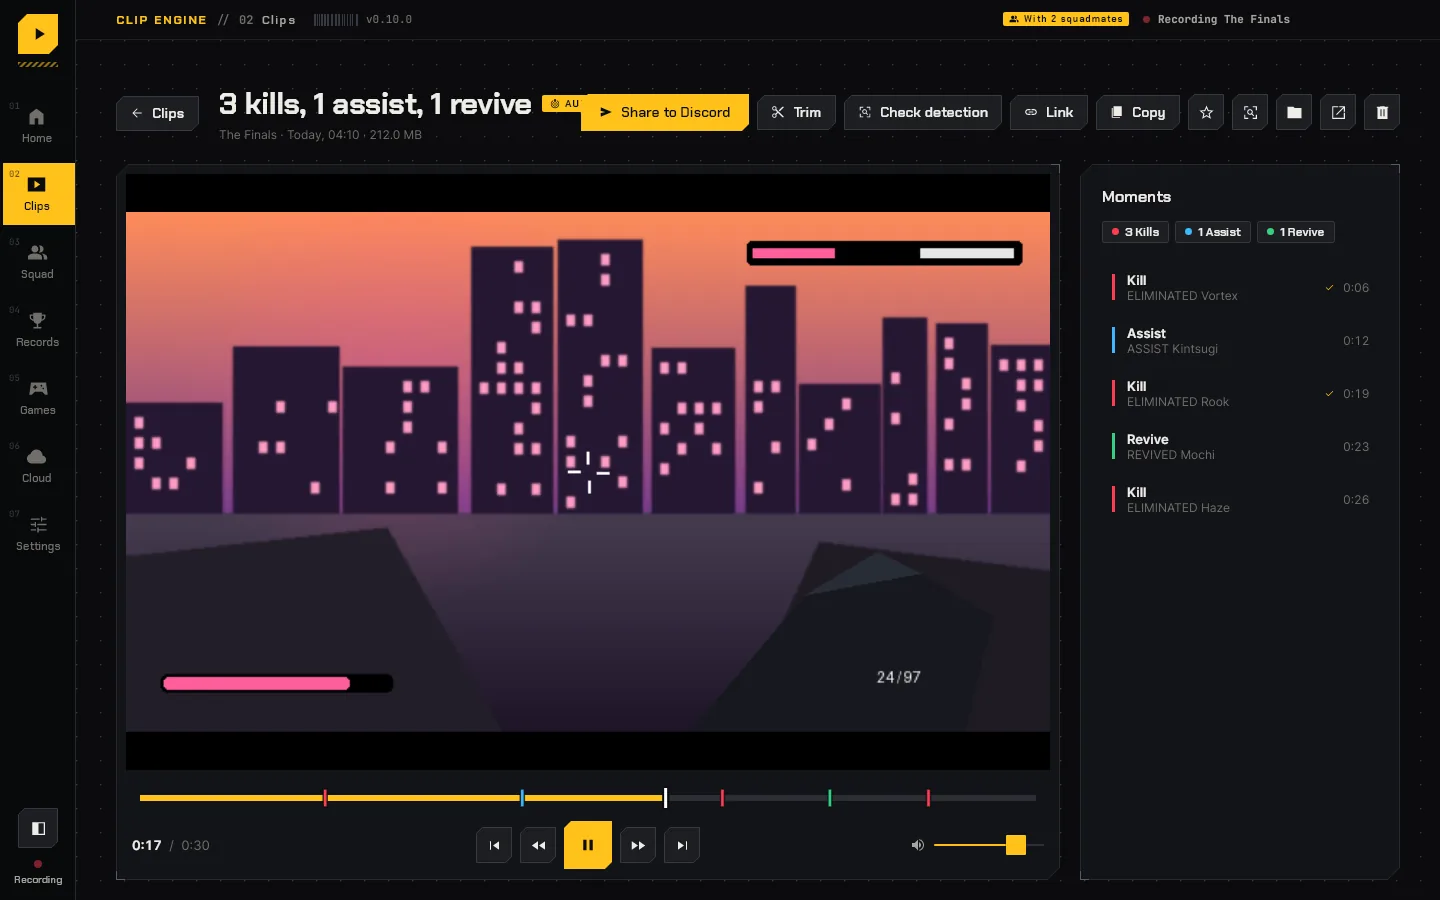
Click a clip to play it. Every detected moment is a mark on the timeline, and the Moments list beside it lets you jump straight to one and see how it was found, down to what was read off the screen.
- Space plays or pauses, ← and → skip 5 seconds, and the arrows by the timeline go to the previous or next moment.
- Trim, Edit, Link and Share to Discord are along the top. See Trimming and the editor and Sharing.
- The menu also copies the full-quality clip to paste anywhere, shows it in its folder, opens it in your default video player, or deletes it.
- If a moment was counted wrongly, See it in Studio opens that frame in Detection Studio with the rule that counted it.
Trimming and the editor
Trim
Press Trim in the player, move to where it should start and press I or [, then to the end and press O or ]. Save trimmed clip saves that part as a new clip next to the original, with no quality lost. More editing takes it into the editor.
The editor
Press Edit (or E) to cut a clip into parts, take out what you don't need, put parts in another order and export a new clip with its moments kept. The original clip is never changed, and your edit is remembered, so reopening the clip picks it up.
- S splits the part under the playhead in two. Delete cuts the picked part out.
- I or [ starts the part here; O or ] ends it here. You can also drag the ends of a part.
- The arrows on each part play it earlier or later. Ctrl+D plays the picked part twice.
- Ctrl+Z undoes, Ctrl+Y redoes, and Start over puts the whole clip back.
- Ctrl and the mouse wheel, or + and −, zoom the timeline.
- Export (Ctrl+E) saves the edit as a new clip; pick how big the video is first.
Shape, brand and captions
In the editor, the Shape, brand and captions options apply to the clip you export. They come with Pro and Ultra; Free exports keep the clip's own shape.
Vertical, square and wide
Under Shape, pick 9:16 for TikTok, Shorts and Reels or 1:1 for Instagram and X, or keep it 16:9. Crop looks at moves the crop sideways: most games keep the action in the middle, but you can move it toward a HUD or minimap at the side. Ultra can export all three, 16:9, 9:16 and 1:1, in one go.
Your brand
Set up your brand once in Settings › Your brand on exports: a logo (a PNG) and its size, a line of text such as @yourchannel with its font and colour, the corner they sit in and how see-through they are, the colour of your captions, and an intro and outro clip (MP4s) played before and after. In the editor, turn on Brand to put it on an export.
Captions
Press Make from speech under Captions. Windows' speech recognition listens to the edit on your PC and writes what's said, one line each: when it shows, when it goes, and what it says, like 0:01.0 - 0:03.0 nice shot. Fix any line by hand. Captions are burned into the export in your brand's colour, on a dark box or without one. If you change the cuts afterwards, the editor says the times may be off; make them again or fix them.
Storage and cleanup
Clips are saved to Videos\Clip_Engine, one folder per game. Change it with Clips folder in Settings › Storage.
- Delete old clips removes clips older than 7, 30 or 90 days.
- Size limit removes the oldest clips once the folder passes 50, 100 or 250 GB.
- Clean up now runs it straight away instead of waiting.
Starred clips, clips you imported and anything saved in the last hour are always kept.
Supported games
Clip Engine finds games installed through Steam, Epic, Battle.net, the EA app, Ubisoft Connect, Riot, the Xbox app and Roblox, and lists them on the Games page. Recording starts the moment one opens. F8 works in every game, listed or not.
| Game | How moments are found |
|---|---|
| Counter-Strike 2 | Official game events: kills (with headshots and weapon), assists, deaths, 3K, 4K and ACE rounds, round MVPs, match start and result. |
| Dota 2 | Official game events: kills, deaths, assists, multi-kills, the horn and the result. |
| League of Legends | Official live data: kills, deaths, assists, multi-kills, aces, first blood, dragons, Baron and steals, game start and result. |
| Rocket League | Official stats: goals, assists, demolitions, saves, kickoff and the result. |
| Team Fortress 2 | Its console log, which names every kill: your kills (with weapon and crits) and deaths. |
| Valorant, Marvel Rivals, Rainbow Six Siege, Delta Force, Deadlock, Halo Infinite, Paladins, Splitgate | The killfeed, by your in-game name, plus round and match banners and medals. |
| The Finals | The killfeed by your name, backed up by the score line and the elimination sound; assists, revives and match messages from the HUD. |
| Battlefield 6, 2042, V, 1 and 4 | The KILL line under the crosshair and the killfeed by your name; assists, revives, deaths and results from the HUD. |
| Halo: The Master Chief Collection | "You killed…" and "…killed you", medals and the end of the game. No in-game name needed. |
| Overwatch, Fortnite, Apex Legends, PUBG, Call of Duty | The HUD's kill, death, revive and match messages. |
| ARC Raiders, Escape from Tarkov, Hunt: Showdown 1896, Helldivers 2, Deep Rock Galactic | The journal of each run, with death and extraction (or mission end) screens clipped. |
| Roblox, Minecraft and any game you add | The universal HUD reader, until you add rules in Detection Studio or install a detection pack. |
Official events turn on by themselves
For CS2, Dota 2, Rocket League and Team Fortress 2, Clip Engine adds a small config file to the game the first time it finds it. A game that was already open needs one restart to pick it up. Dota 2 may also need -gamestateintegration in its Steam launch options. League's live data is always on during a game.
The universal HUD reader
A game with no rules of its own is still read: the reader looks where most HUDs show kills, deaths and results, and a small learned model decides what each line means, with your in-game name telling your kills from everyone else's. It's a best guess, and it gets better as you teach it. Turn it off with Universal HUD reader in Settings › Automatic clips.
A game that isn't listed
On the Games page, press Add a game. Start the game, pick its window from the running programs, give it a name and press Add game. Clip Engine records whenever that program runs.
Your in-game name
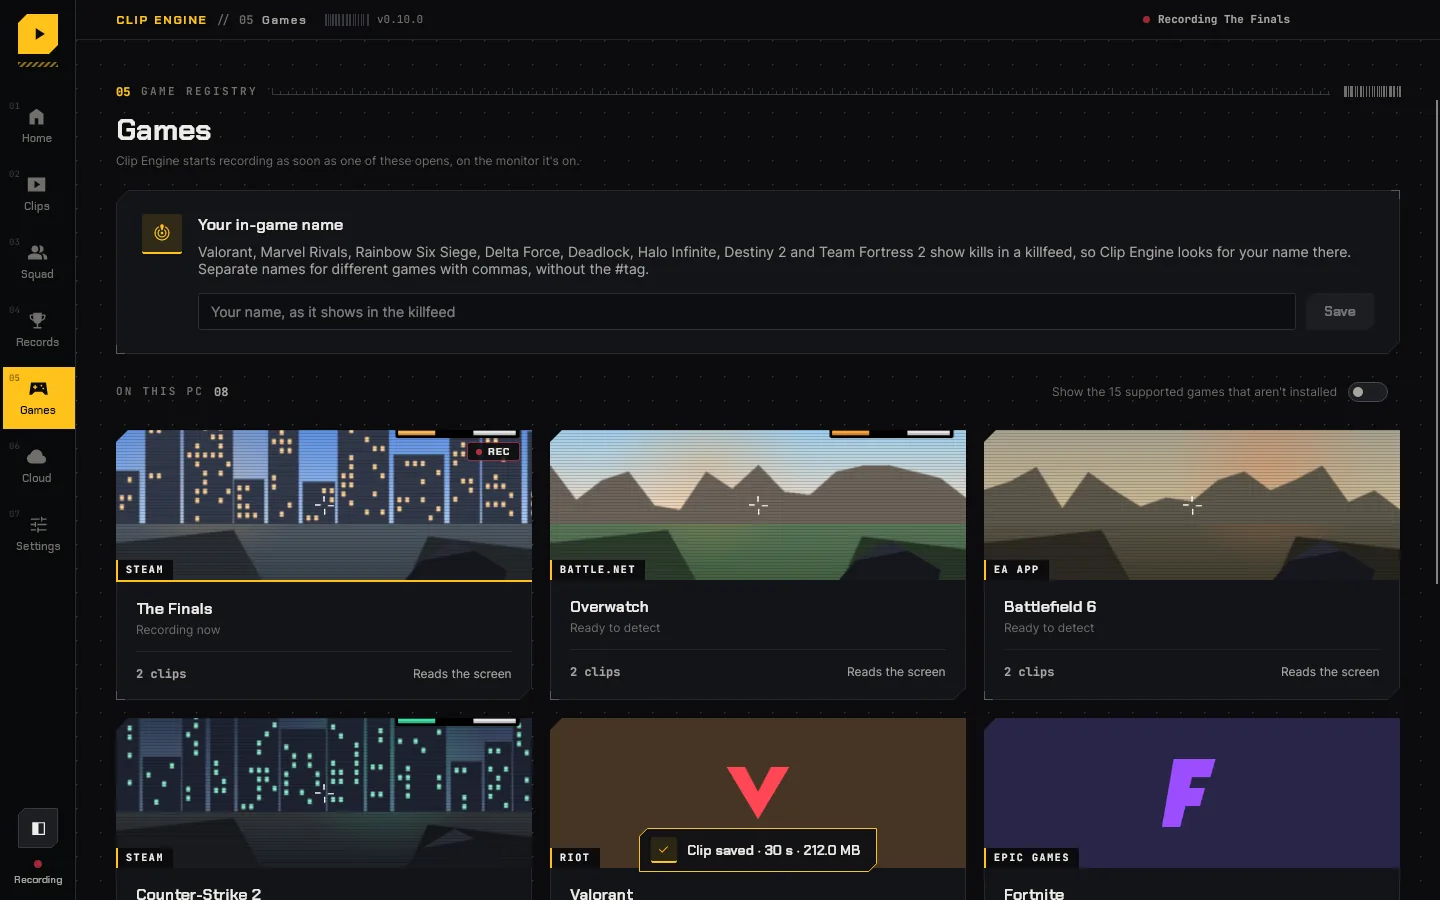
A killfeed shows everyone's kills, so Clip Engine looks for your name in it to know which are yours. On the Games page, type your name under Your in-game name exactly as it shows in the killfeed, without the #tag, and press Save.
If you use different names in different games, separate them with commas: kai, kai_fps, KaiTTV. Scoreboards use your name too, so your records get the exact numbers.
Check detection and Teach
In the player, Check detection lets you mark what really happened in a clip and see what Clip Engine caught, missed or got wrong.
- Mark the momentsPlay the clip and press M at each kill, death or other moment (1 to 7 picks which kind the next mark is). Start from detected begins with what was found, so you only fix the mistakes.
- Run detectionRuns the game's rules over the whole clip and lists what was Missed and what was Not really there.
- TeachFor games read by the universal HUD reader, Teach learns from your marks: what it missed and what it counted wrongly. Mark every moment in the clip first.
For a missed moment, jump to it and open Detection Studio from there to fix the rule.
Detection Studio
Detection Studio is where you add a game or fine-tune how one is read. Open it from the Games page with Open Studio, or from a moment in the player.
- Pick a frameChoose any of your clips (or open another video or a screenshot) and step to a frame that shows the moment: ← → move a tenth of a second, with Shift a whole second.
- Draw a boxPress + Box rule and drag over where the game shows the kill. Drag the box to move it, or a corner to resize it.
- Type the wordsUnder When the box shows any of these, type what it says, with
|between choices:ELIMINATED | KNOCKED OUT. + Your name adds your in-game name for a killfeed; + Any number matches a score line likeELIMINATION +100. Close misreads still count. - Test itTest on this frame (Ctrl+Enter) shows what's read in the box and whether it matches. Whole clip and Marked clips run it further.
- SaveSave rules (Ctrl+S) saves every game's changes, and the engine restarts to use them.
Worth knowing
- HUD size in the game: set it to match the game's own HUD or interface scale. Boxes move and resize with it, on any screen shape, ultrawide included.
- + Sound at this frame cuts the sound that starts there (like a kill chime) and adds a rule that listens for it, to back up the screen.
- Brightness filter keeps only bright pixels, for text on a busy background.
- Use built-in puts the game's shipped rules back. Games you haven't changed keep getting rule updates.
- For a HUD that shows an icon instead of words, a rule can look for a picture of the icon cut from a screenshot.
Detection packs
A detection pack is one .cepack file with a game's rules, their icons and sounds, and what the universal HUD reader learned about it. Set a game up once and share it with friends.
- To share: in Detection Studio, pick the game and press Share pack.
- To install: on the Games page, press Install pack, or drop the file on Clip Engine's window. The game is set up from your next match.
Records
The Records page keeps every kill, assist, death and revive Clip Engine sees, clipped or not: lifetime totals, K/D and wins, personal bests in every game, recent matches, and the match you're playing against your best, live. Where a game has a scoreboard, its exact numbers fill in. Add your in-game name so scoreboards can be read.
If a game's numbers look off, Tune its rules opens it in Detection Studio.
Journal
In ARC Raiders, Escape from Tarkov, Hunt: Showdown 1896, Helldivers 2 and Deep Rock Galactic, the Journal page keeps a field journal of every run: the map and conditions you picked (and the times you backed out), what you took in, each enemy you took down, what you found, whether you made it out or what you lost, and the XP from the results screen.
- Each run is told as a short story in the game's own words, and links to the clips saved during it.
- Personal bests, how you do on each map, and the items you find and lose most build up as you play.
- PvP kills the screen doesn't show can be added by hand with + and −.
- Turn it off with Keep a journal of each run in Settings › Automatic clips.
FPS and PC stats overlay
A slim strip in a corner of your game: frame rate, 1% lows, CPU, GPU and its temperature, video memory and RAM. Numbers turn yellow, then red, when something is holding the game back. It reads what Windows already measures, never touches the game, and never shows up in your clips.
- Turn it onIn Settings › Stats overlay, turn on FPS and PC stats over the game, or press Alt+Shift+F while you play.
- Allow the FPS counterWindows only shares frame timing with administrators and its Performance Log Users group. Press Allow once and accept Windows' prompt, then sign out of Windows and back in. Everything else works without it.
- Pick what it showsChoose the readings and the corner it sits in.
Games that use Vulkan or OpenGL don't report frame timing to Windows, so FPS shows -- there; the other readings still work.
Squads
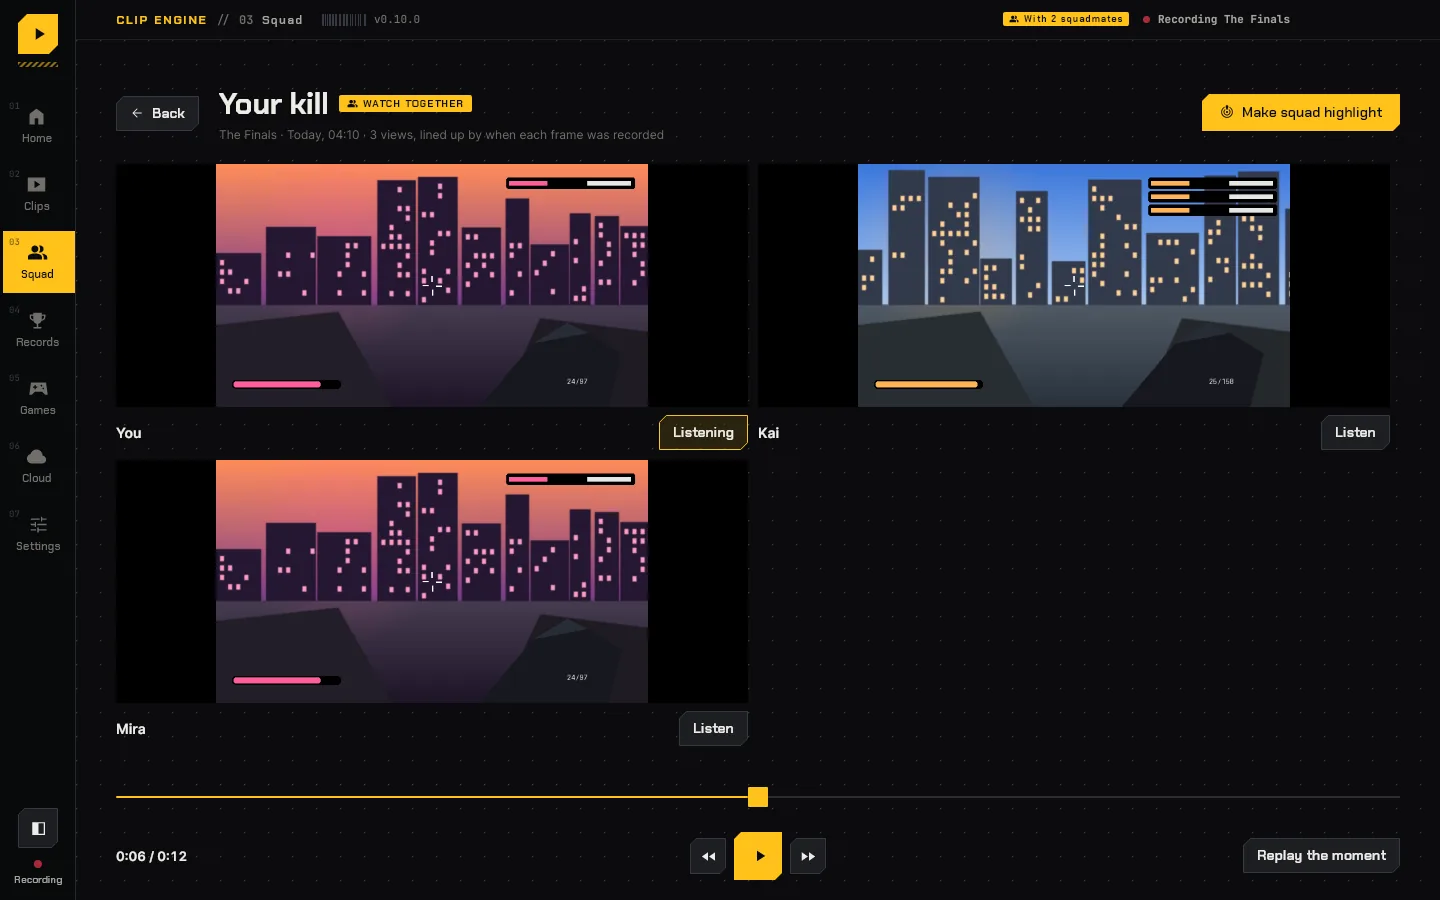
Play with friends who use Clip Engine, and every moment any of you gets is saved from everyone's view, lined up to the same second.
- Make a squadOn the Squad page, type the name your squad will see and press Make squad. A squad can have up to 8 people.
- Invite your friendsPress Copy link or Copy code under Invite and send it. Opening the link fills it in for them; or they paste it under Join a squad.
- Play togetherWhen you're in the same match, Clip Engine links you up by itself. A kill, revive or win by anyone is saved by every linked teammate too.
The shared library
Everyone's views of each moment land in the Shared library on the Squad page.
- Watch together plays up to four views of the same moment side by side on one timeline.
- Make highlight cuts the play and a replay from each view into one clip.
- Ask for views asks squadmates to send theirs.
What you share
Under What you share, choose whether your views go to the library for Highlights, Everything or Never, and which moments you tell the squad about. While a game is recorded, uploads go slowly so your game's connection comes first. Unlink next to a member stops saving each other's views without leaving the squad.
Friends
The Friends page shows who's online, what they're playing and for how long. Friends are kept with your cloud account, so they follow you to every PC.
- Add a friend: type their username (like
@kai) or friend code (likeK7QM-2X9D) and press Send request. They get a request to accept. - Your friend code and username are on the same page, ready to copy and send.
- Join a squad: right-click a friend, or press Join squad next to them when they share theirs. Turn on Let friends join my squad to share yours.
- Tell me when friends come online shows a small notice, over your game too.
Cloud account and library
Share links, your profile, friends and squads need a free cloud account. Make one on the Cloud page with your email and a password, or with Google. Your email is how you sign in on other PCs and get back in if you forget your password; it's never shown to anyone. Accounts are for people 13 or older (16 in the EU and UK).
Your username and profile
One username is used everywhere: friends find you by it, and it's on your profile page and every clip you post. Public clips show on your profile, pinned ones first. Free accounts can change it once a month, Pro and Ultra once a week.
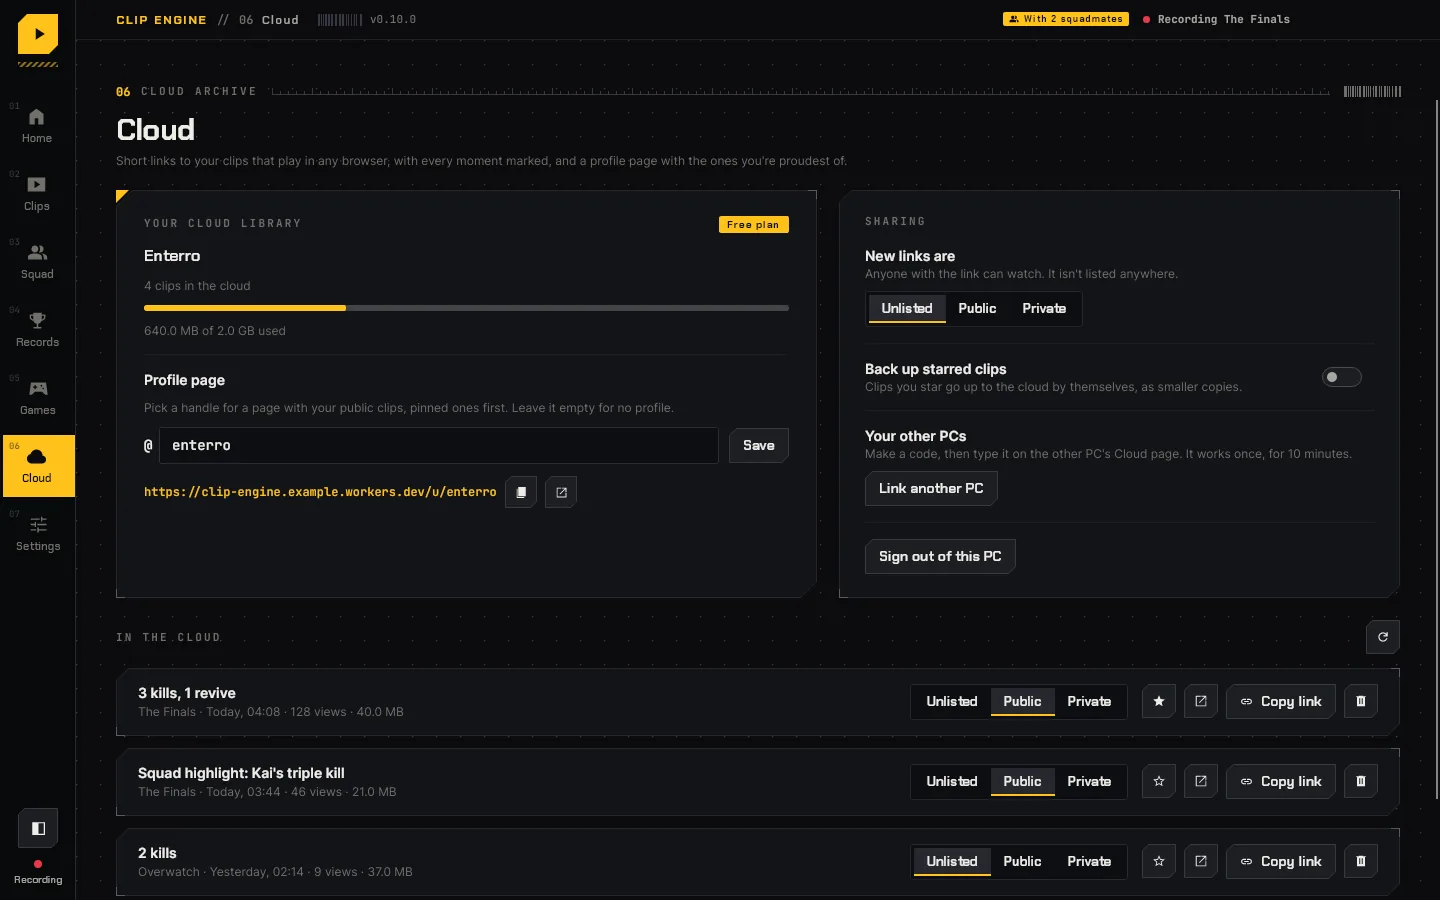
Your cloud library
- In the cloud lists every clip you've uploaded. Change who can see each one (Unlisted, Public or Private), copy its link, or remove it, which stops its link at once.
- Back up starred clips sends clips you star up by themselves, as smaller copies.
- How much fits, and how big and long each clip can be, depends on your plan.
Signing in on another PC
Sign in with your email and password or Google, or press Link another PC on a PC that's signed in and type the code on the new one under A code from another PC. The code works once, for 10 minutes.
Deleting your account
Delete your account on the Cloud page (or on the hub) deletes your clips in the cloud and their links, your profile, name, email and friends, and signs out every PC. The clips on your PC stay. It can't be undone.
The hub
The hub has everyone's public clips on the web, newest or most watched, by game, and searchable. Watching needs no account, and nothing goes there unless you set it to Public.
- Open the hub on the app's Cloud page opens it already signed in. On your phone or any browser, sign in with your email and password, Google, or a code from the app.
- Signed in, you can change who sees each clip, change your email or password, hide your badge, and see and sign out every device on your account.
- Anyone can report a clip that shouldn't be there.
Teams
With Ultra, up to five people share one clip library in the cloud: bring in your editor, your duo or your clients.
- Start a teamOn the Team page, type your team's name and press Make the team. Making one needs Ultra; joining one doesn't need any plan.
- Invite peopleUnder People, type a username or friend code and press Invite, as an editor (adds clips, brand kits and review links) or a viewer (watches, downloads and reads feedback). They accept with Join on their Team page.
- Add clipsPress Add a clip in the Library. Everyone in the team can watch it, download it into their clips folder under Team, and send it for review. Clips share the owner's 300 GB of Ultra space.
Brand kits
A brand kit is a logo, a line of text, caption colours and an intro and outro that everyone's exports can carry, so a sponsor's or channel's clips all look the same. A team keeps up to five, with one as its default. Pick a kit in the editor's Brand the same way as your own brand.
Review links
Under Review links, pick a team clip and press Make the link and copy it. It's a private page with that one clip for a client or sponsor, with an optional title and password (4 or more characters), and it ends by itself after the time you pick, from a day to 30 days. They can leave notes at any moment of the clip, and the team answers them or marks them done under Feedback. A week more keeps a link open longer; End now closes it.
Keeping it tidy
- Pin a clip and it's never removed. Remove unpinned clips in Team settings clears clips older than the time you pick, from 30 days to a year.
- Older clips move to colder storage: still there to watch and download, just a little slower to start.
- If the owner's Ultra plan ends, the team is paused: everything stays to watch and download, and adding starts again when they're back on Ultra.
- Delete the team removes every clip, brand kit and review link in it for everyone. Anyone else can Leave the team.
Side panel
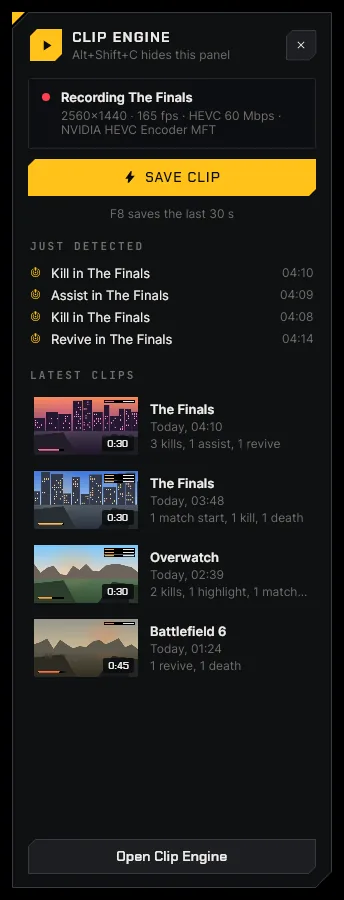
Press Alt+Shift+C in a game for a slim panel on the edge of the screen, over your game: a Save clip button, the moments just detected, notifications and your latest clips. Pick the key and which edge it docks to in Settings › Side panel and sharing.
Notifications
A small pop-up when a friend sends a request or comes online, after each clip is saved, when someone joins your squad, a few days before your subscription renews, and when an update is out. The bell in the sidebar and Home's activity keep the list either way.
- In Settings › Notifications, choose which kinds pop up under Show pop-ups for, or turn Pop-ups off altogether.
- Over the game too shows them in the game's corner while you play. They never show up in your clips.
Discord status
With Discord status on (in Settings › Hotkeys), your Discord profile shows the game you're playing, the match time, your kills and the clips you've saved. On the Squad page, Join button on Discord adds a Join my squad button to it with your invite; anyone who sees your profile can use it.
Colour themes
Pro has thirteen colour themes, and Ultra adds three more, a colour wheel to pick any colour, and adaptive themes with gradients and motion. Pick one under Colour theme in Settings › Plan. Motion there turns the app's small animations on or off; they're always off while Windows' animation effects are.
Free, Pro and Ultra
Clip Engine is free: every recording, detection, squad and sharing feature, at up to 1080p, with nothing stamped on the clips on your PC. Subscriptions add more for people who want it, and help keep Clip Engine growing.
| Free | Pro | Ultra | |
|---|---|---|---|
| Price | $0 | $4.99 a month or $49 a year | $14.99 a month or $149 a year |
| Recording and exports | Up to 1080p | Up to 4K | Up to 4K |
| Cloud library | 2 GB | 50 GB | 300 GB |
| Each cloud clip | Up to 1080p, 100 MB and 40 seconds, with a small badge | 4K in original quality, up to 2 GB and 10 minutes, no badge | 4K in original quality, up to 4 GB and 30 minutes, no badge |
| Username changes | Once a month | Once a week | Once a week |
| Extras | — | Vertical and square exports, your brand and captions on exports, thirteen colour themes, a Pro badge, your name in the credits | Everything in Pro, every shape in one export, Teams of up to five with brand kits and review links, every colour on a colour wheel, adaptive themes, an Ultra badge, top of the credits |
Subscribe from the plans on the home page. Payments, tax and receipts are handled by Polar, our merchant of record; Clip Engine never sees your card. Cancel any time and your clips stay yours. Manage in Settings › Plan opens your subscription. Badges can be hidden any time from the app or the hub.
License keys
- Check out with your own emailPolar emails your license key to the address you type at checkout. If it's one you can't open, the key never reaches you.
- Paste the keyIn Settings › Plan, paste it under License key and press Activate.
- On each PCDo the same on every PC you play on. Your plan also follows your cloud account.
A paid plan is checked online about twice a day and keeps working for 14 days without internet. Remove key from this PC takes it off a PC you no longer use. Special keys (starting CEK-) from the developer, such as a free month of Pro, are pasted in the same box.
Free Pro from invites
On the Friends page, press Get my invite link and send it. When three friends install Clip Engine on their own PC and start it, you get a month of Pro: a special key under Your free Pro. Its month starts the first time it's used, so you can save it if you already subscribe.
Each friend has to be on a PC and an internet connection of their own, so a second PC at home doesn't count. If a friend installed without using your link, they can type your code under Did a friend invite you? within a week of installing.
Donations
You can donate any amount, once, from Settings › Plan or the home page. It's never needed, and comes with a few thank-yous:
- a Supporter badge in the app and on your cloud account,
- 1 GB more cloud storage for every dollar, up to 25 GB, for good,
- from $5 in all, your name in the credits in the app and on the website.
Paste the key you're emailed into Settings › Plan. If you also subscribe with the same email, the thank-yous join your plan by themselves.
Troubleshooting
Most fixes are a setting away. Search above for a word from the problem, like "black" or "FPS", to jump to its answer.
Installing and starting
Windows says the app is from an unknown publisher
Early builds aren't code-signed yet. Choose More info, then Run anyway. If your antivirus holds the file, let it through; Clip Engine never touches games' memory or files.
Nothing records when I open a game
- Check that Clip Engine is running (its icon is in the tray) and Home says the engine is running. If not, press Restart engine on Home.
- See if the game is on the Games page. If it isn't, add it with Add a game.
- Clip Engine records the monitor the game is on. If you moved the game, give it a few seconds.
- Still nothing? Send a report with the log from Settings › Reports.
F8 (or another key) does nothing
Another app may be using the same key; overlays, Discord and GPU software often do. Pick a different one in Settings › Hotkeys. If the game runs as administrator, Windows may hide key presses from apps that don't; run Clip Engine the same way, or use the side panel's Save clip.
Detection
My kills aren't being clipped
- Make sure Detect moments and Save clips by themselves are on, with kills picked under Clip these moments.
- For killfeed games, set your in-game name exactly as it shows, without the
#tag. - If you changed the game's HUD or interface scale, match it with HUD size in the game in Detection Studio.
- Raise Reading quality to High.
- Use Check detection on a clip to see what's missed, then fix it in Detection Studio, or press Teach.
Clips are saved for kills that weren't mine
Usually the in-game name is missing or matches someone else's. Check it on the Games page. In the player, open the wrong moment and press See it in Studio to see the rule that counted it.
CS2, Dota 2, Rocket League or Team Fortress 2 events don't come through
- Restart the game once after Clip Engine first sees it, so it loads the config Clip Engine added.
- Dota 2: add
-gamestateintegrationto its Steam launch options. - Team Fortress 2: if a custom HUD or config in
tf\customhas its ownautoexec.cfg, add-condebugto the game's launch options instead.
Video and audio
My clip shows "Game Not Found" or goes black
You switched to another window while Record only the game was on, which keeps everything else out of your clips. Turn it off in Settings › Hotkeys if you'd like the desktop recorded too.
My game stutters or the PC runs out of memory
Lower the resolution or frame rate in Settings › Recording, then the replay buffer. A long buffer at 4K takes several gigabytes of memory; Settings shows how much and warns when it's too much for your PC. A lower Reading quality uses less CPU.
A sound is missing from my clips, or everything is on the game track
Check the track is on and not muted in Settings › Audio, then press Save changes. Separate game, Discord and app tracks need Windows 10 version 2004 or newer; on older versions the game track is everything you hear.
Voice clips don't hear me
Voice clips use Windows' speech recognition, which needs a speech recognizer for your language (Windows Settings, Time & language, Speech). Check the phrase is spelled as you say it, try a higher Sensitivity, and make sure your microphone is the Windows default.
The overlay shows "--" for FPS
Press Allow under FPS needs Windows' permission in Settings › Stats overlay, then sign out of Windows and back in. Games that use Vulkan or OpenGL don't report frame timing, so FPS stays -- there.
Sharing, cloud and plans
A clip won't upload
Each plan has a limit on a cloud clip's size and length: on Free, 100 MB and 40 seconds. Trim the clip first, or see the plans. Also check your cloud library isn't full on the Cloud page.
My license key didn't arrive
Look in your spam folder for an email from Polar. If you typed the wrong address at checkout, send a report from Settings › Reports or the report page with the details, and we'll sort it out.
My plan went back to Free
A paid plan keeps working for 14 days without internet. Connect, and it's checked again by itself. If you cancelled, it ends when the paid time runs out; your clips stay yours.
My squadmates' views aren't showing up
Everyone needs to be in the same squad and the same match, with Clip Engine running and signed in. Check nobody is unlinked in Members, and that Send your views to the library isn't set to Never. Views upload slowly during a game; press Refresh after the match, or Ask for views.
Questions
Will it slow my game down?
Capture and encoding run on your GPU's dedicated video hardware, and screen reading only looks at frames that are already finished. Most players won't notice it running.
Can I get banned for using it?
Clip Engine never touches the game's memory or files. It records the screen the same way Windows' own tools do, so there's nothing for anti-cheat to flag.
Is it really free?
Yes. Recording, automatic clips, the player, the editor, squads, friends and sharing are free for everyone, at up to 1080p, and nothing is ever stamped on the clips on your PC.
Do my clips get posted anywhere?
Only if you choose. Clips stay on your PC until you upload or share one. A shared clip is unlisted unless you set it to Public.
Does it work on a laptop?
Yes, as long as its graphics have a video encoder, which nearly all from the last ten years do. On battery, a lower resolution and frame rate keep it cooler.
Can I use it alongside OBS, Medal or Discord?
Yes. Clip Engine doesn't hook into games, so it runs next to other recorders. Just make sure two apps aren't using the same hotkey.
Is there a Mac or Linux version?
Not yet. Clip Engine is built on Windows' own capture and video hardware, so it's Windows 10 and 11 for now.
Keyboard shortcuts
While you play
| F8 | Save the last 30 seconds |
| F9 | Start or stop a long recording |
| Alt+Shift+C | Side panel |
| Alt+Shift+F | Stats overlay |
Player
| Space | Play or pause |
| ← → | Back or forward 5 seconds |
| I or [, O or ] | Set the start and end of a trim |
| E | Open the editor |
| M, 1–7 | In Check detection: mark a moment, and pick which kind |
Editor
| S | Split at the playhead |
| I or [, O or ] | Start or end the part here |
| Delete | Cut the picked part out |
| Ctrl+D | Duplicate the picked part |
| ↑ ↓ | Previous or next cut |
| Ctrl+Z, Ctrl+Y | Undo, redo |
| + − | Zoom the timeline |
| Ctrl+E | Export |
Detection Studio
| ← → | A tenth of a second back or on (with Shift, a second) |
| ↑ ↓ | Previous or next moment in the clip |
| Ctrl+Enter | Test on this frame |
| Ctrl+D, Delete | Copy or remove the picked rule |
| Ctrl+S | Save rules |
| Esc | Back |
Files and folders
| What | Where |
|---|---|
| Clips and long recordings | Videos\Clip_Engine\<Game>\, or the folder you picked |
| Settings | %LOCALAPPDATA%\Clip_Engine\ |
| Log | %LOCALAPPDATA%\Clip_Engine\clip_engine.log, or Open log on Home |
| The app (installer) | %LOCALAPPDATA%\Programs\Clip Engine\ |
Paste a path starting with %LOCALAPPDATA% into File Explorer's address bar to open it. Every clip says it was made with Clip Engine in its file details, and has a small .json beside it with its moments.
Privacy and safety
- Your clips stay on your PC unless you share or upload one.
- Detection runs on your PC. Screen reading and voice clips never send what they see or hear anywhere.
- Safe with anti-cheat. Clip Engine records with Windows screen capture and never touches a game's memory or files.
- Online, only what's needed: your email, the clips you upload, your username, friends and squads, whether you're online, and the devices signed in to your account. None of it is ever sold or shared with advertisers.
- The first time Clip Engine starts on a PC, it tells the online service so, with a hashed id for the PC, so friends who invited you get credit.
The privacy notice and the terms have the details.
Get help
Found a bug, want something changed, or have a thought on the design? Send a report from Settings › Reports in the app, or the report page on the hub. No account needed, and every report is read. You can also email support@clipengine.org.
- From the app, a bug report can bring the end of the log with it, which helps with crashes and clips that don't save. Only the developer sees it.
- Leave an email or Discord name if you'd like an answer there. The developer also answers right in the app, under Your reports.
- Reports being worked on go on the public board.
Something here out of date? Tell us.